

Prerequisites
- You’ve received a Jam Assistant invitation with the Admin role (check your inbox - you must accept it before proceeding)
- Salesforce System Administrator profile or equivalent access
Note: The Jam Assistant Connected App will not appear in Salesforce until at least one user has initiated the OAuth flow from within Jam Assistant. If you do not see Jam Assistant under Connected Apps OAuth Usage yet, complete the Salesforce connection in Jam Assistant first (via Customize → Integrations → Salesforce), then return here.
How Jam Assistant Connects to Salesforce
Jam Assistant uses a registered Salesforce Connected App with a fixed OAuthclient_id - the same identity across all customer organisations. When a user connects Jam Assistant to Salesforce, they authorise this app through the standard Salesforce OAuth 2.0 flow. No passwords are stored; access is governed entirely by Salesforce’s Connected App policies.
Every request Jam Assistant’s servers send to your org leaves from a fixed IP address. If your org restricts access by IP address, allowlist it as described in Allowlisting Jam Assistant in Salesforce.
Step 1 - Find Jam Assistant in Connected Apps OAuth Usage
Navigate to Setup → Apps → Connected Apps → Connected Apps OAuth Usage. You will see Jam Assistant listed alongside other connected apps in your org.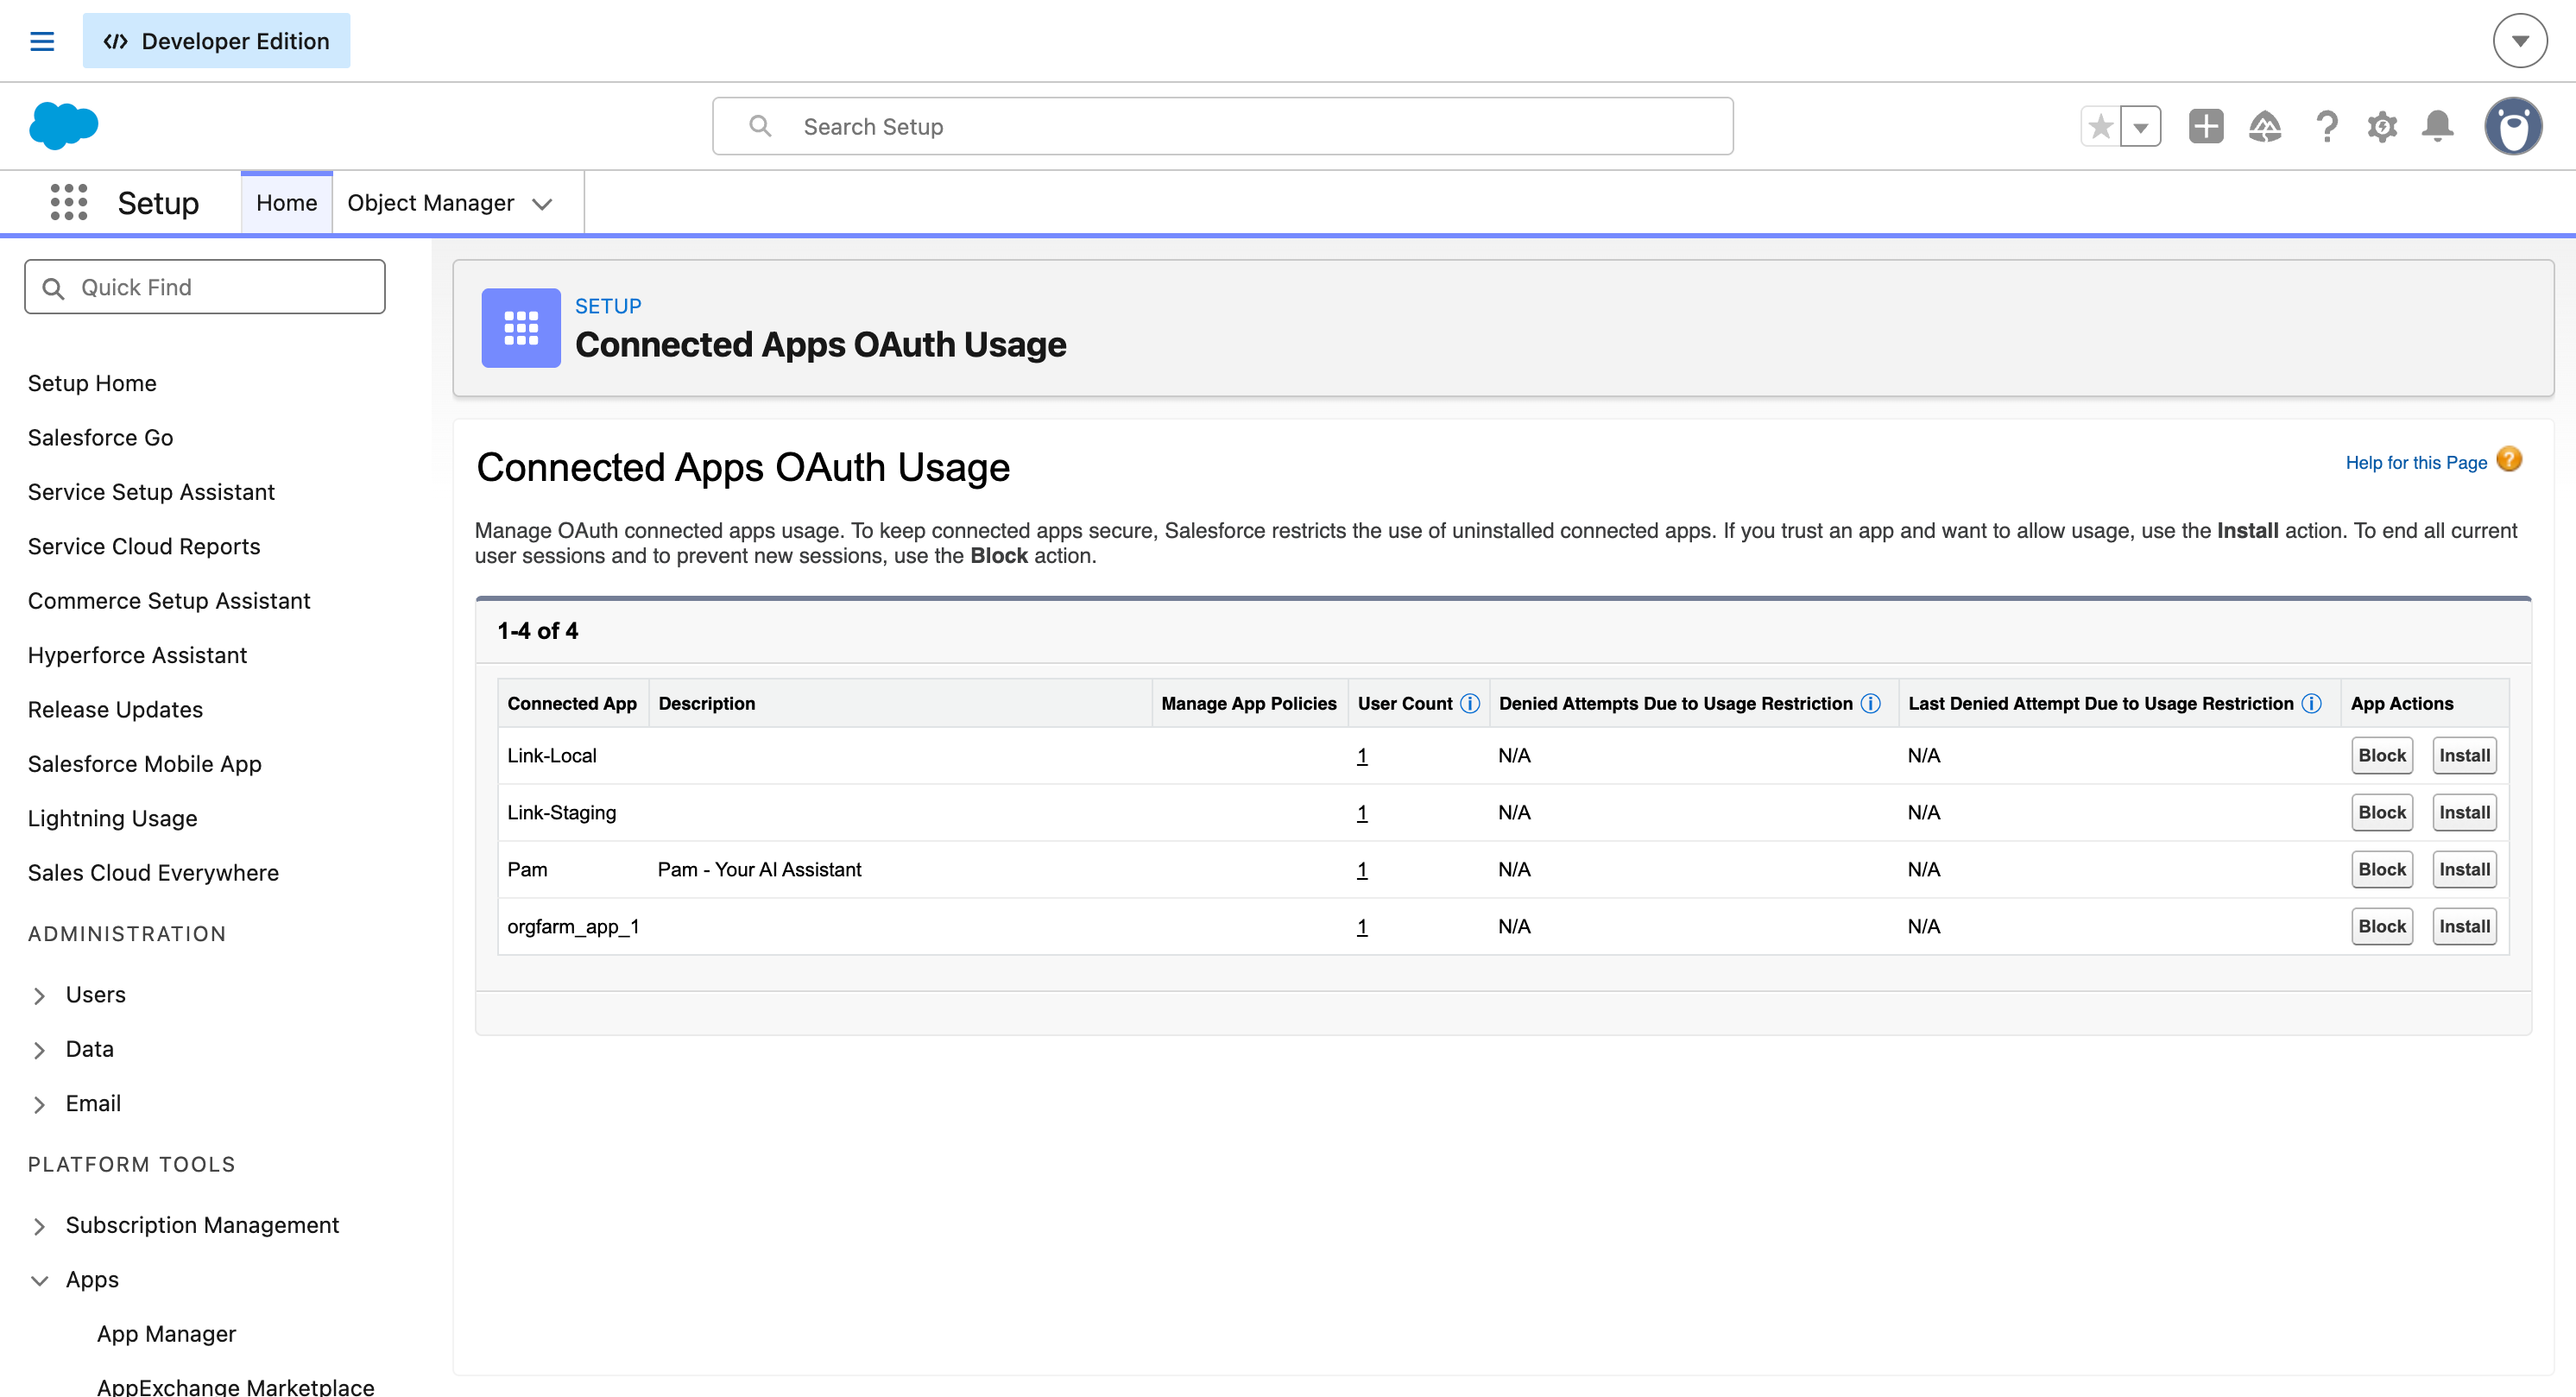 At this point the Install button is shown - Jam Assistant has been OAuth’d by a user but not yet formally installed at the org level. The app is visible and manageable here regardless of installation status.
Step 2 - Install Jam Assistant at the Org Level
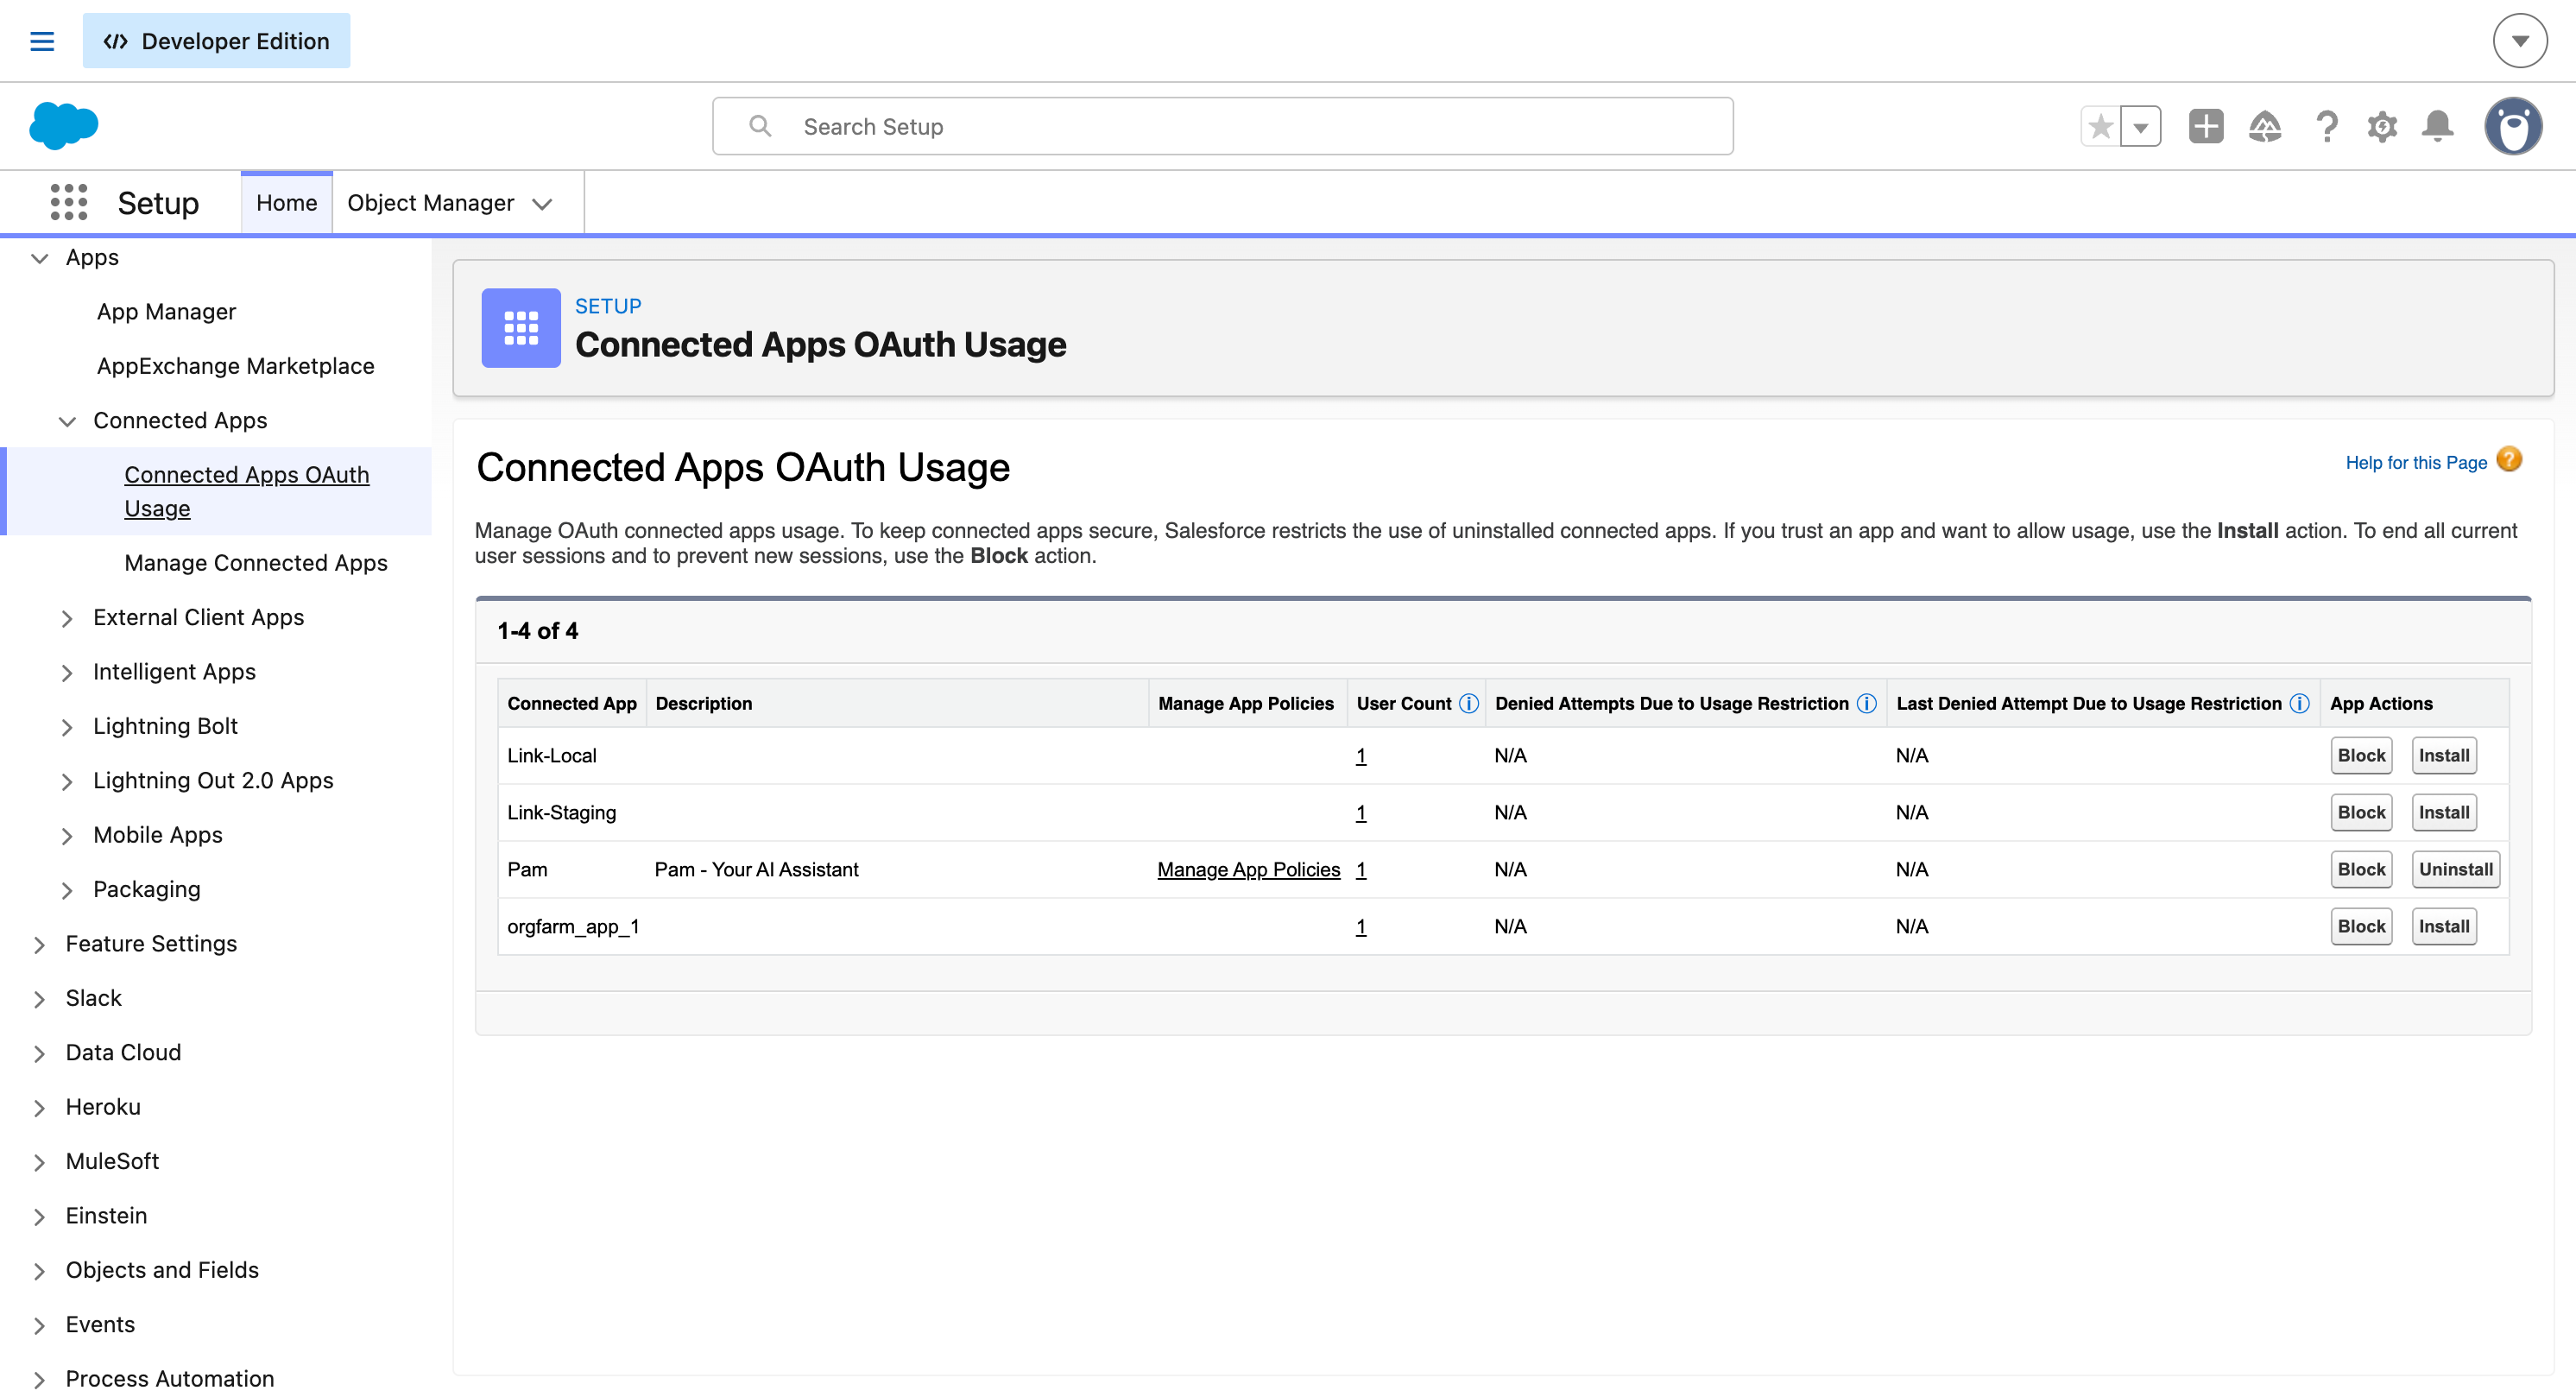
Click Install next to Jam Assistant. Salesforce will show a confirmation dialog.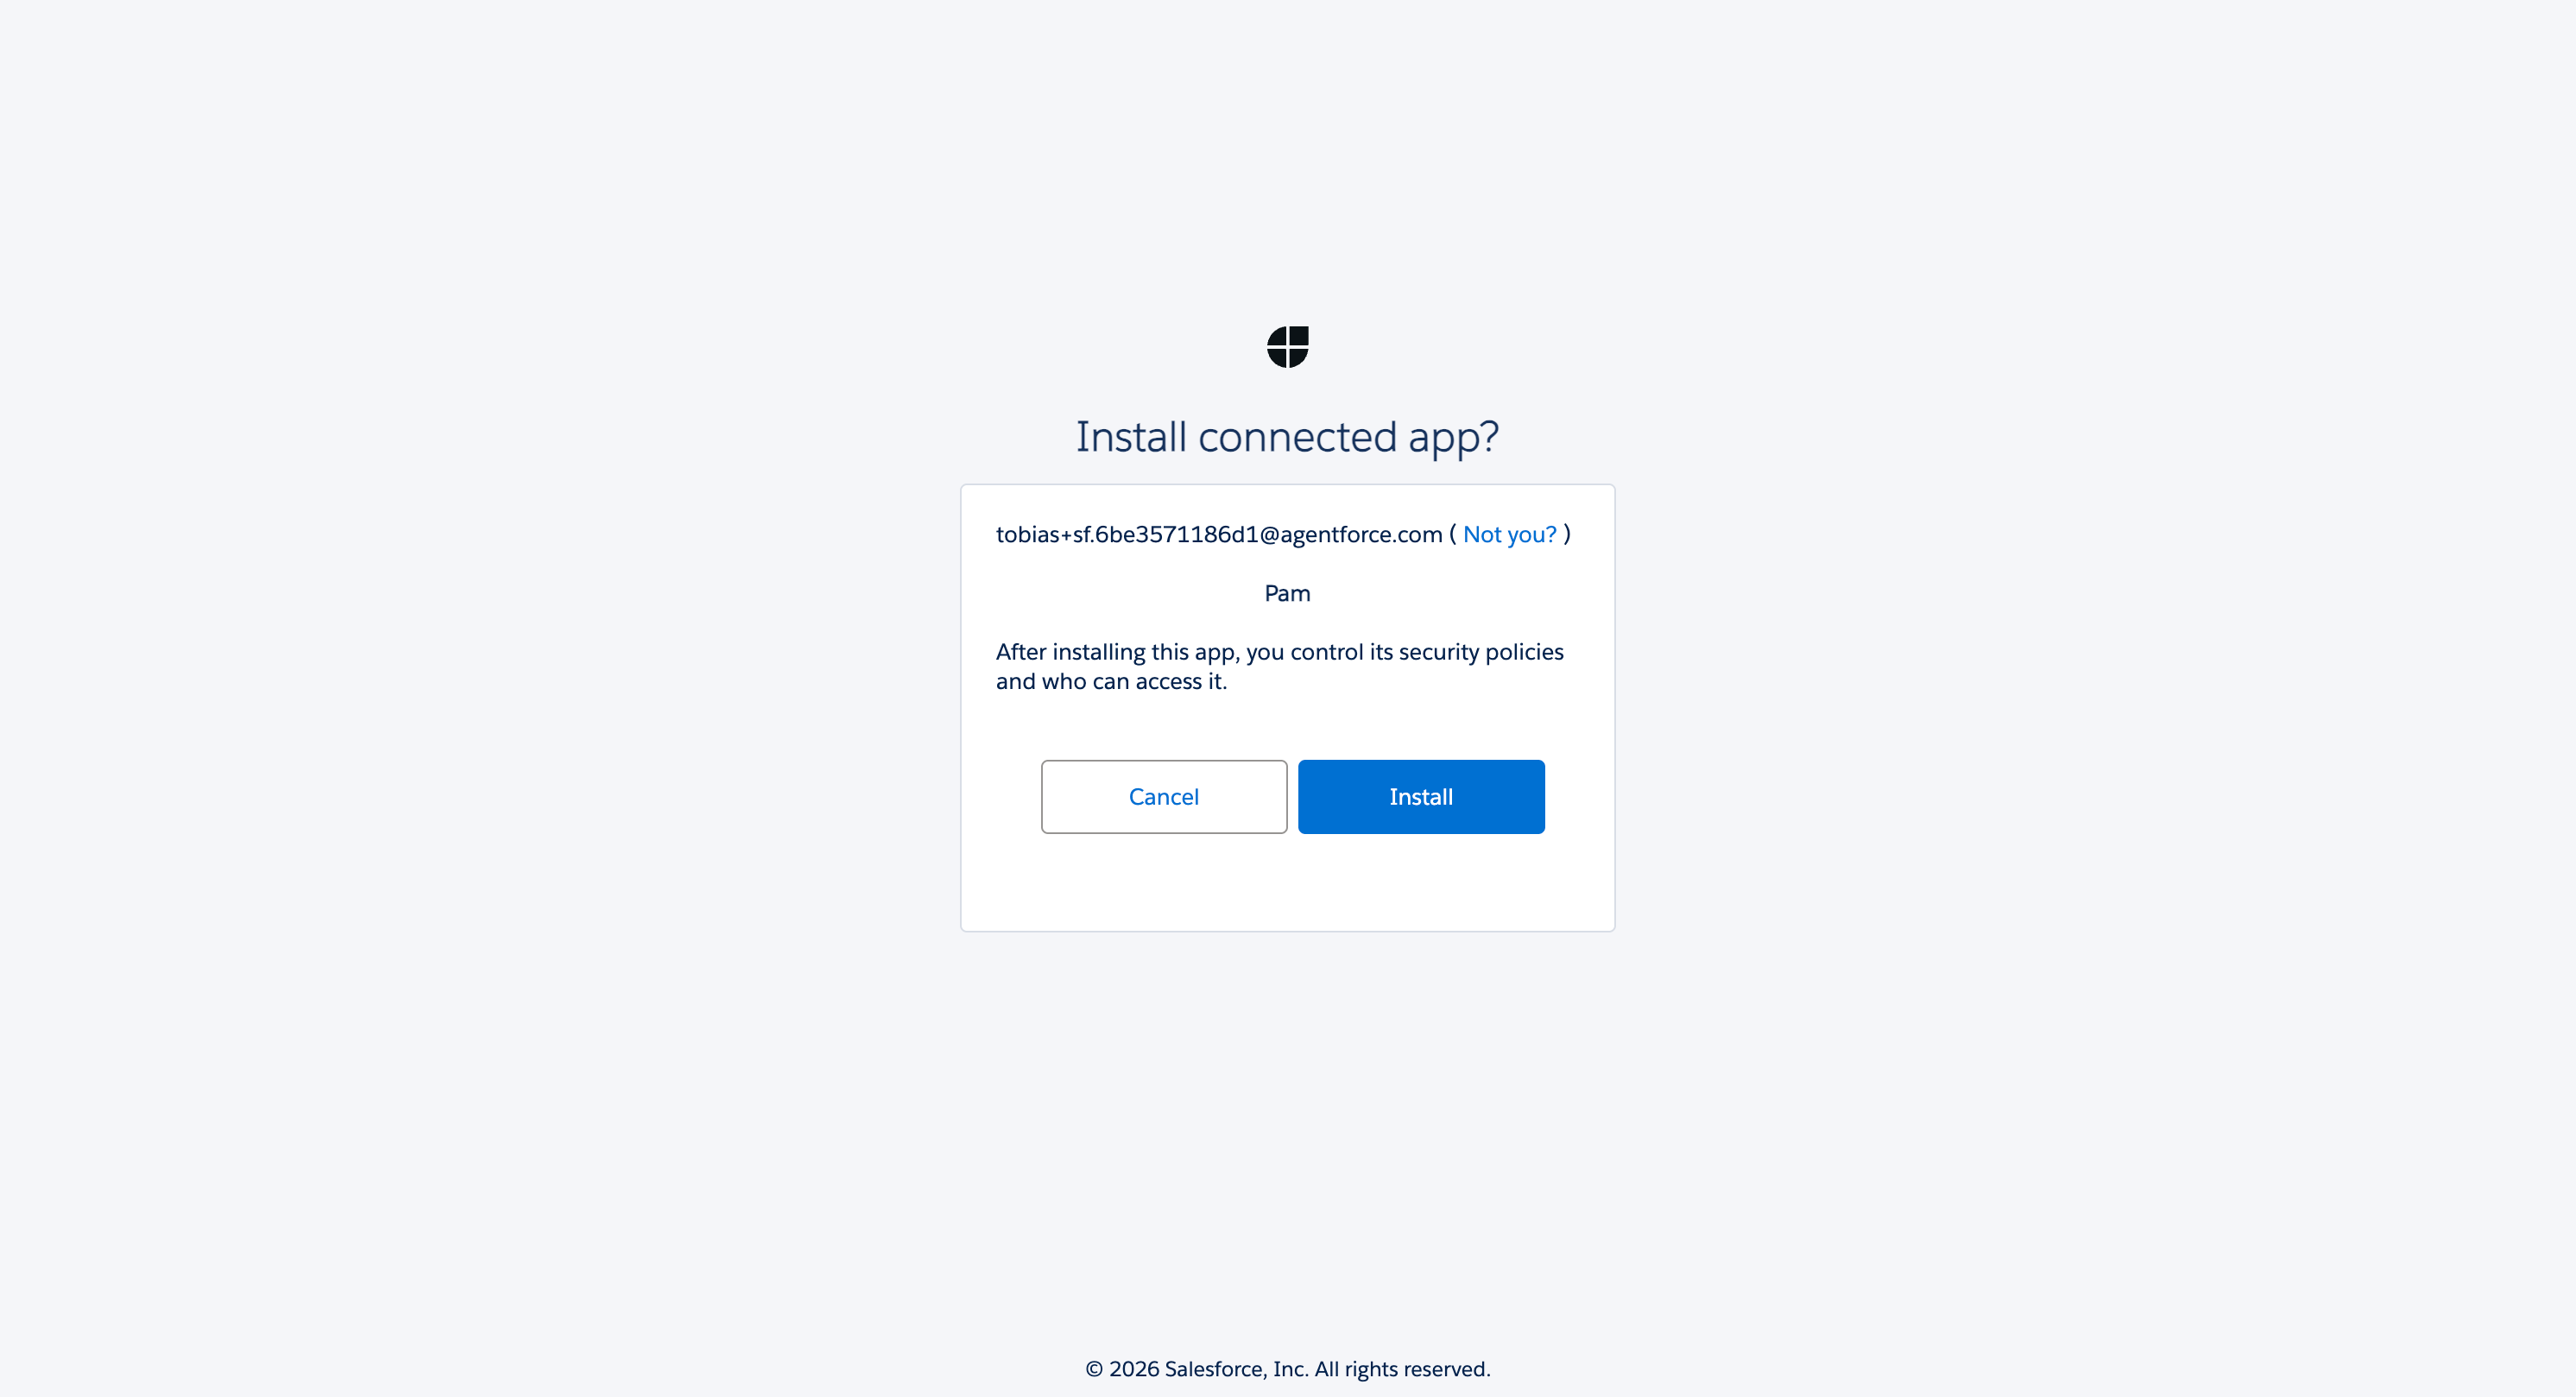 Click Install. After installation, the Uninstall button replaces Install, and a Manage App Policies link appears - confirming Jam Assistant is now org-level managed.
Step 3 - Review the Connected App Detail
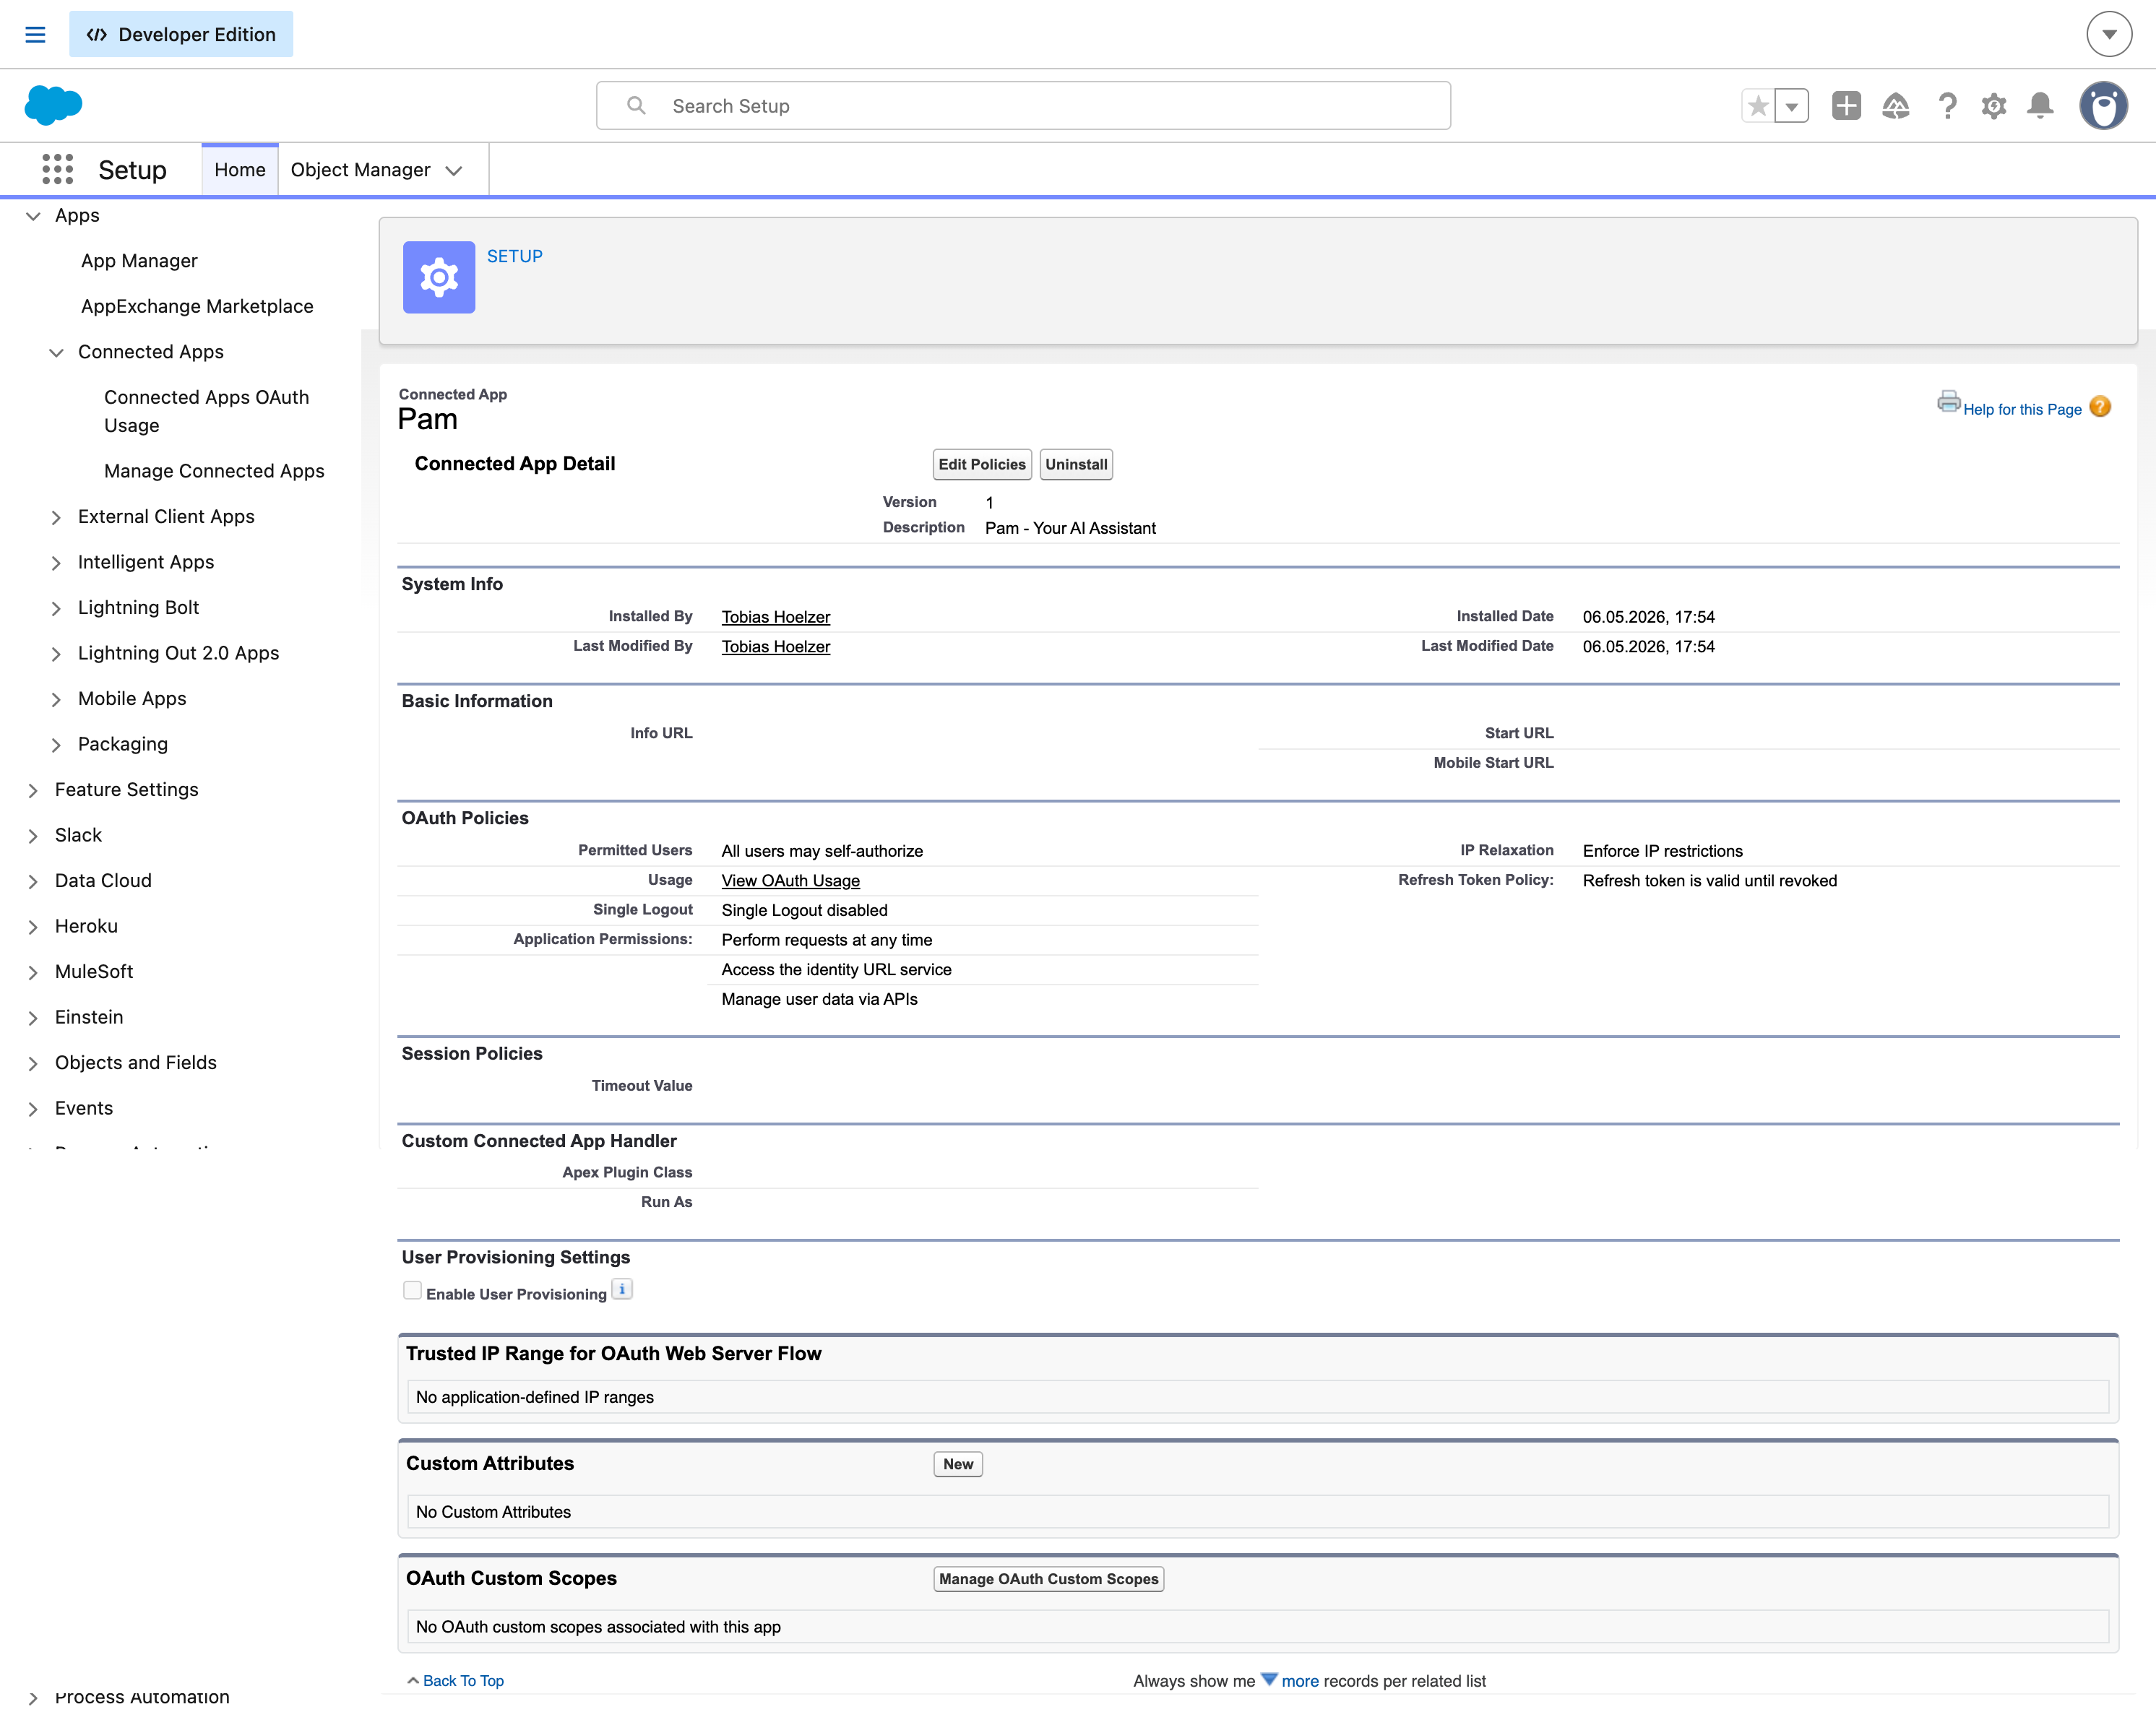
After installation, click Jam Assistant (or navigate via Setup → Apps → Connected Apps → Manage Connected Apps → Jam Assistant) to view the full app detail.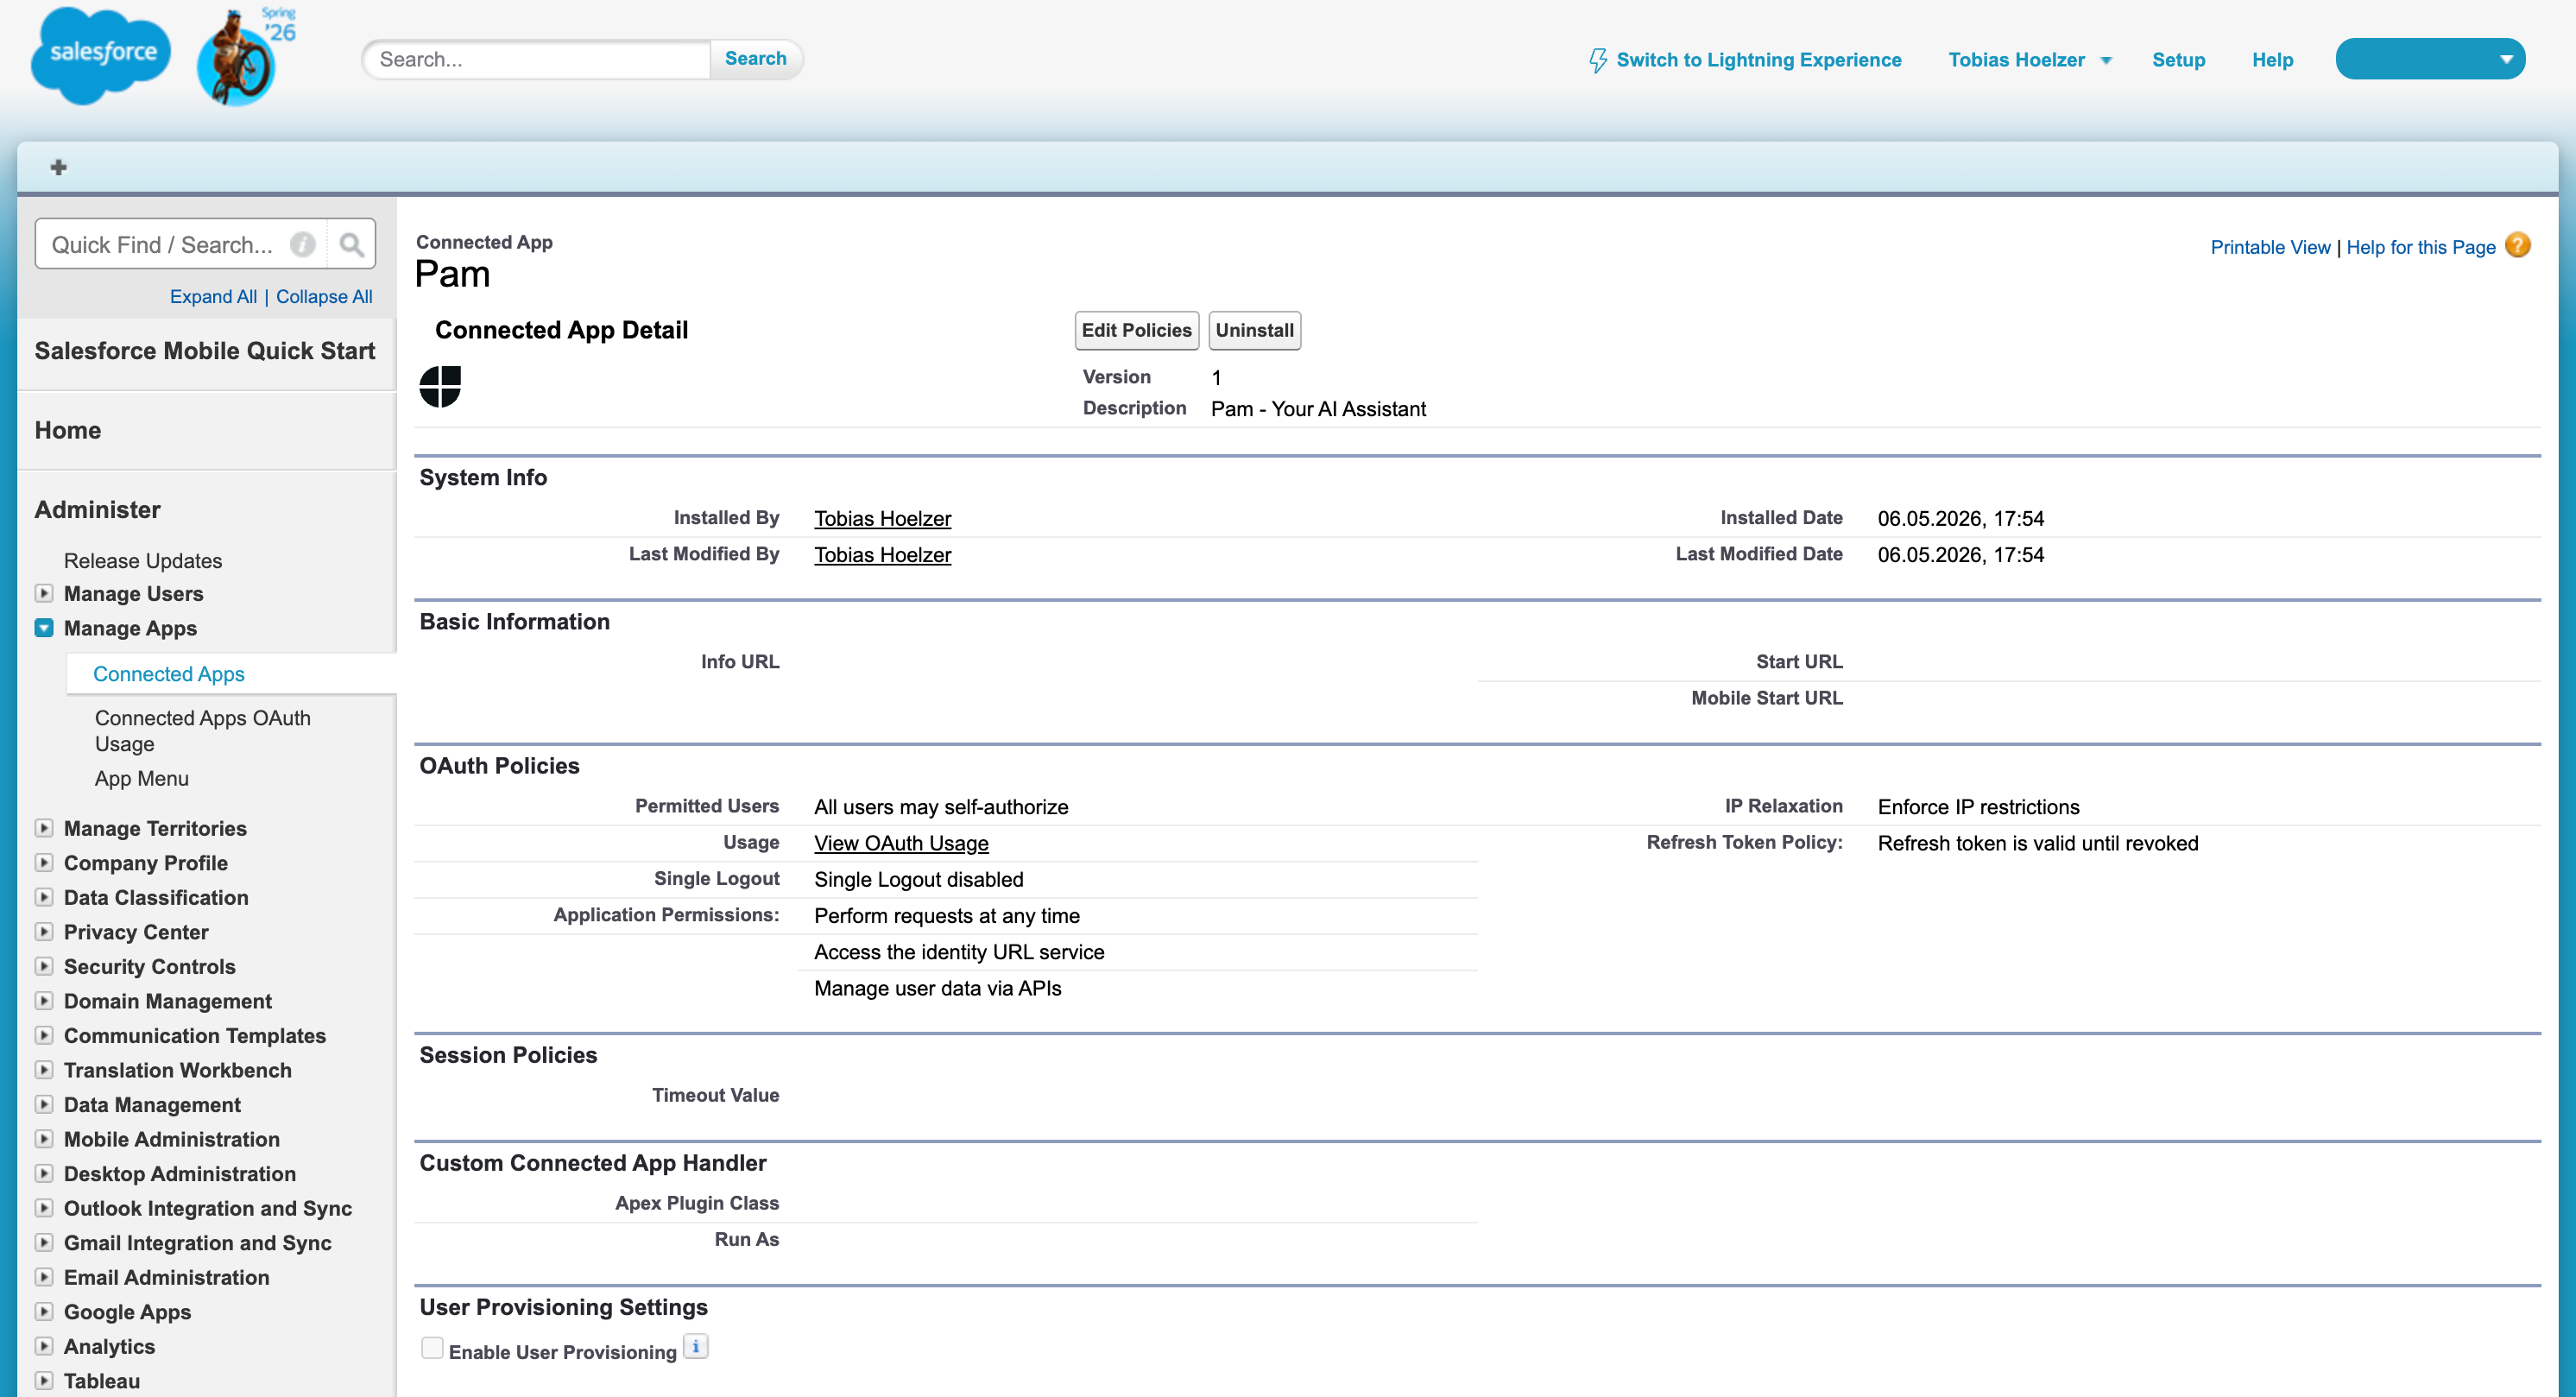 Key settings visible here:
Step 4 - Manage Access Policies
From the Connected App Detail, click Edit Policies to configure access controls.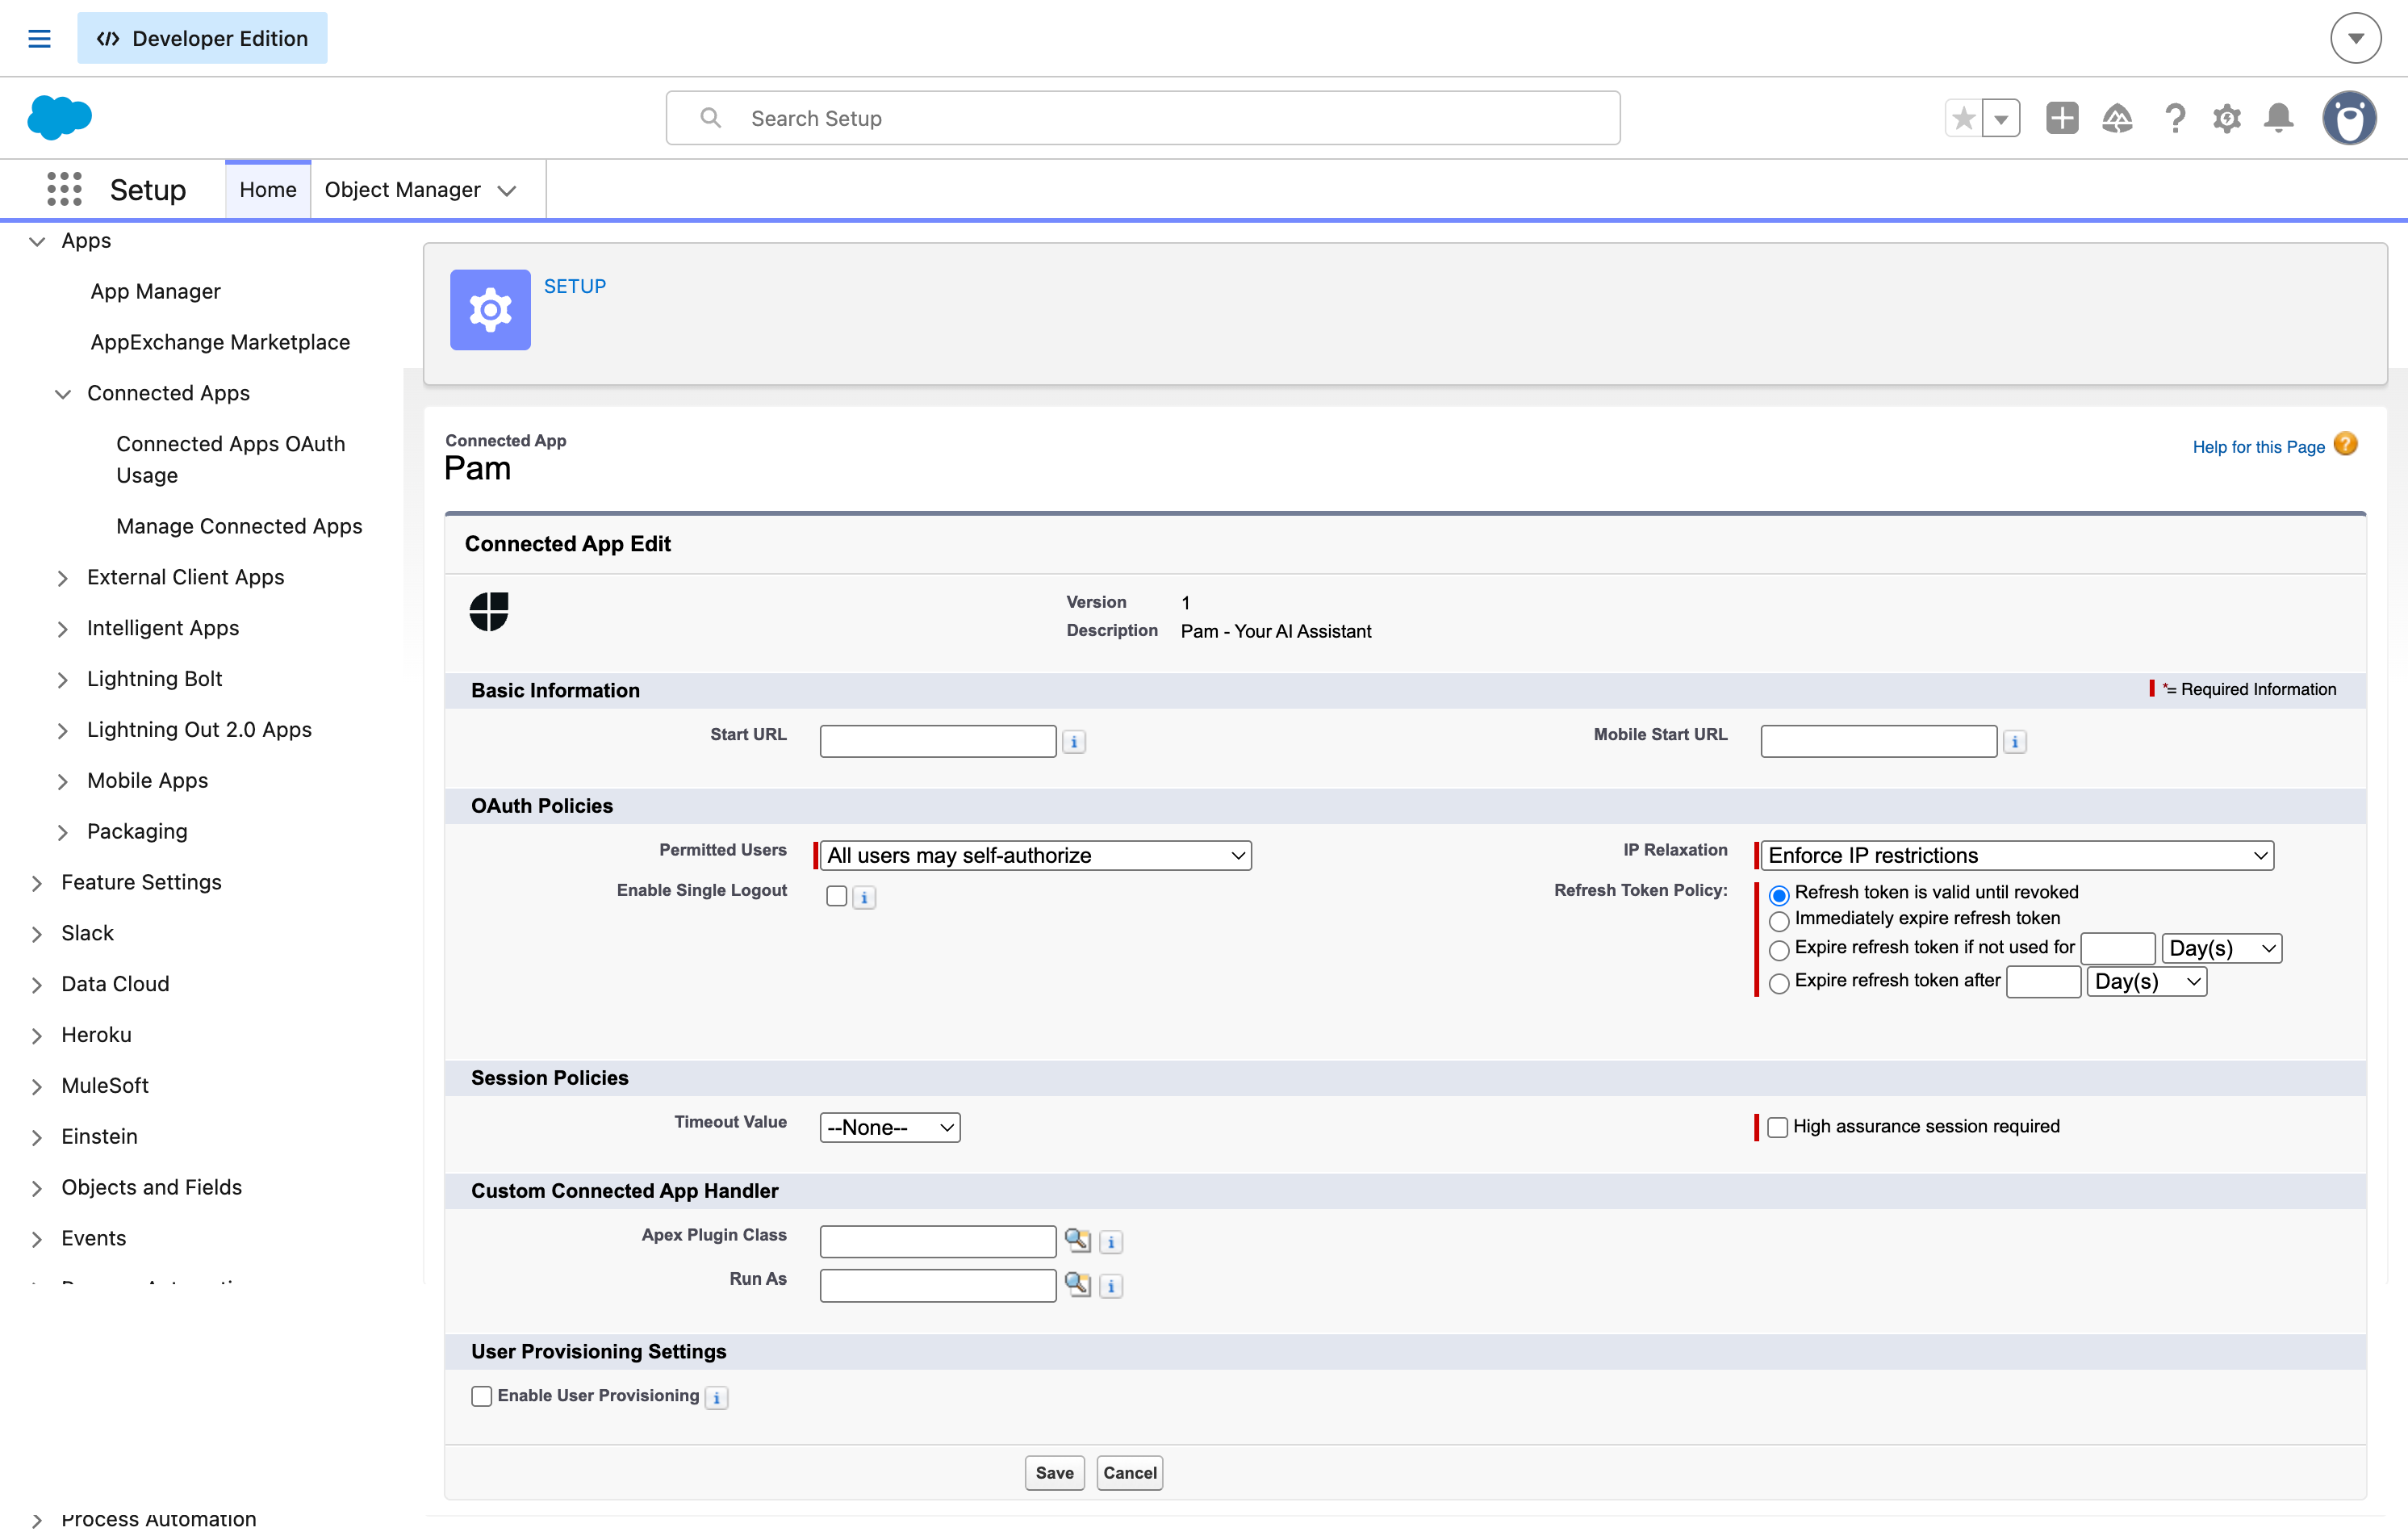 Available controls:
- Permitted Users - change from “All users may self-authorize” to a specific profile or permission set to restrict who can connect
- Refresh Token Policy - set expiry or immediately revoke all refresh tokens
- IP Relaxation - enforce or relax IP restrictions for this app. If you enforce them, the profiles of connecting users must include Jam Assistant’s fixed IP address in their Login IP Ranges, see Allowlisting Jam Assistant in Salesforce
- High Assurance Session Required - require step-up authentication
Understanding the Two Permission Layers
Jam Assistant’s Salesforce access is controlled at two independent levels:1. OAuth scopes (Connected App level - fixed)
The Connected App requests three OAuth scopes from Salesforce. These are set by Jam and cannot be changed by your admin:
All three scopes must remain enabled on the Connected App. Removing any of them will break the integration.
2. User profile and permission set (user level - tunable)
Jam Assistant acts as the authorising user. It can only access objects and fields that user is permitted to see in Salesforce - nothing more. This is where you control blast radius. To limit what Jam Assistant can do, create a dedicated Salesforce permission set that grants access only to the specific objects and fields your team needs (for example, read-only on Accounts, Contacts, and Opportunities). Assign that permission set to users who connect Jam, and remove broader profile-level access where appropriate.Reconnection note: If you want to change the authorising user - for example, swap from a broad admin account to a dedicated integration user with restricted permissions - you must revoke the existing token and reconnect as the new user from within Jam Assistant (via Customize → Integrations → Salesforce).
Step 5 - Manage Connected Apps Overview
Navigate to Setup → Apps → Connected Apps → Manage Connected Apps to see all installed apps and their permitted user settings.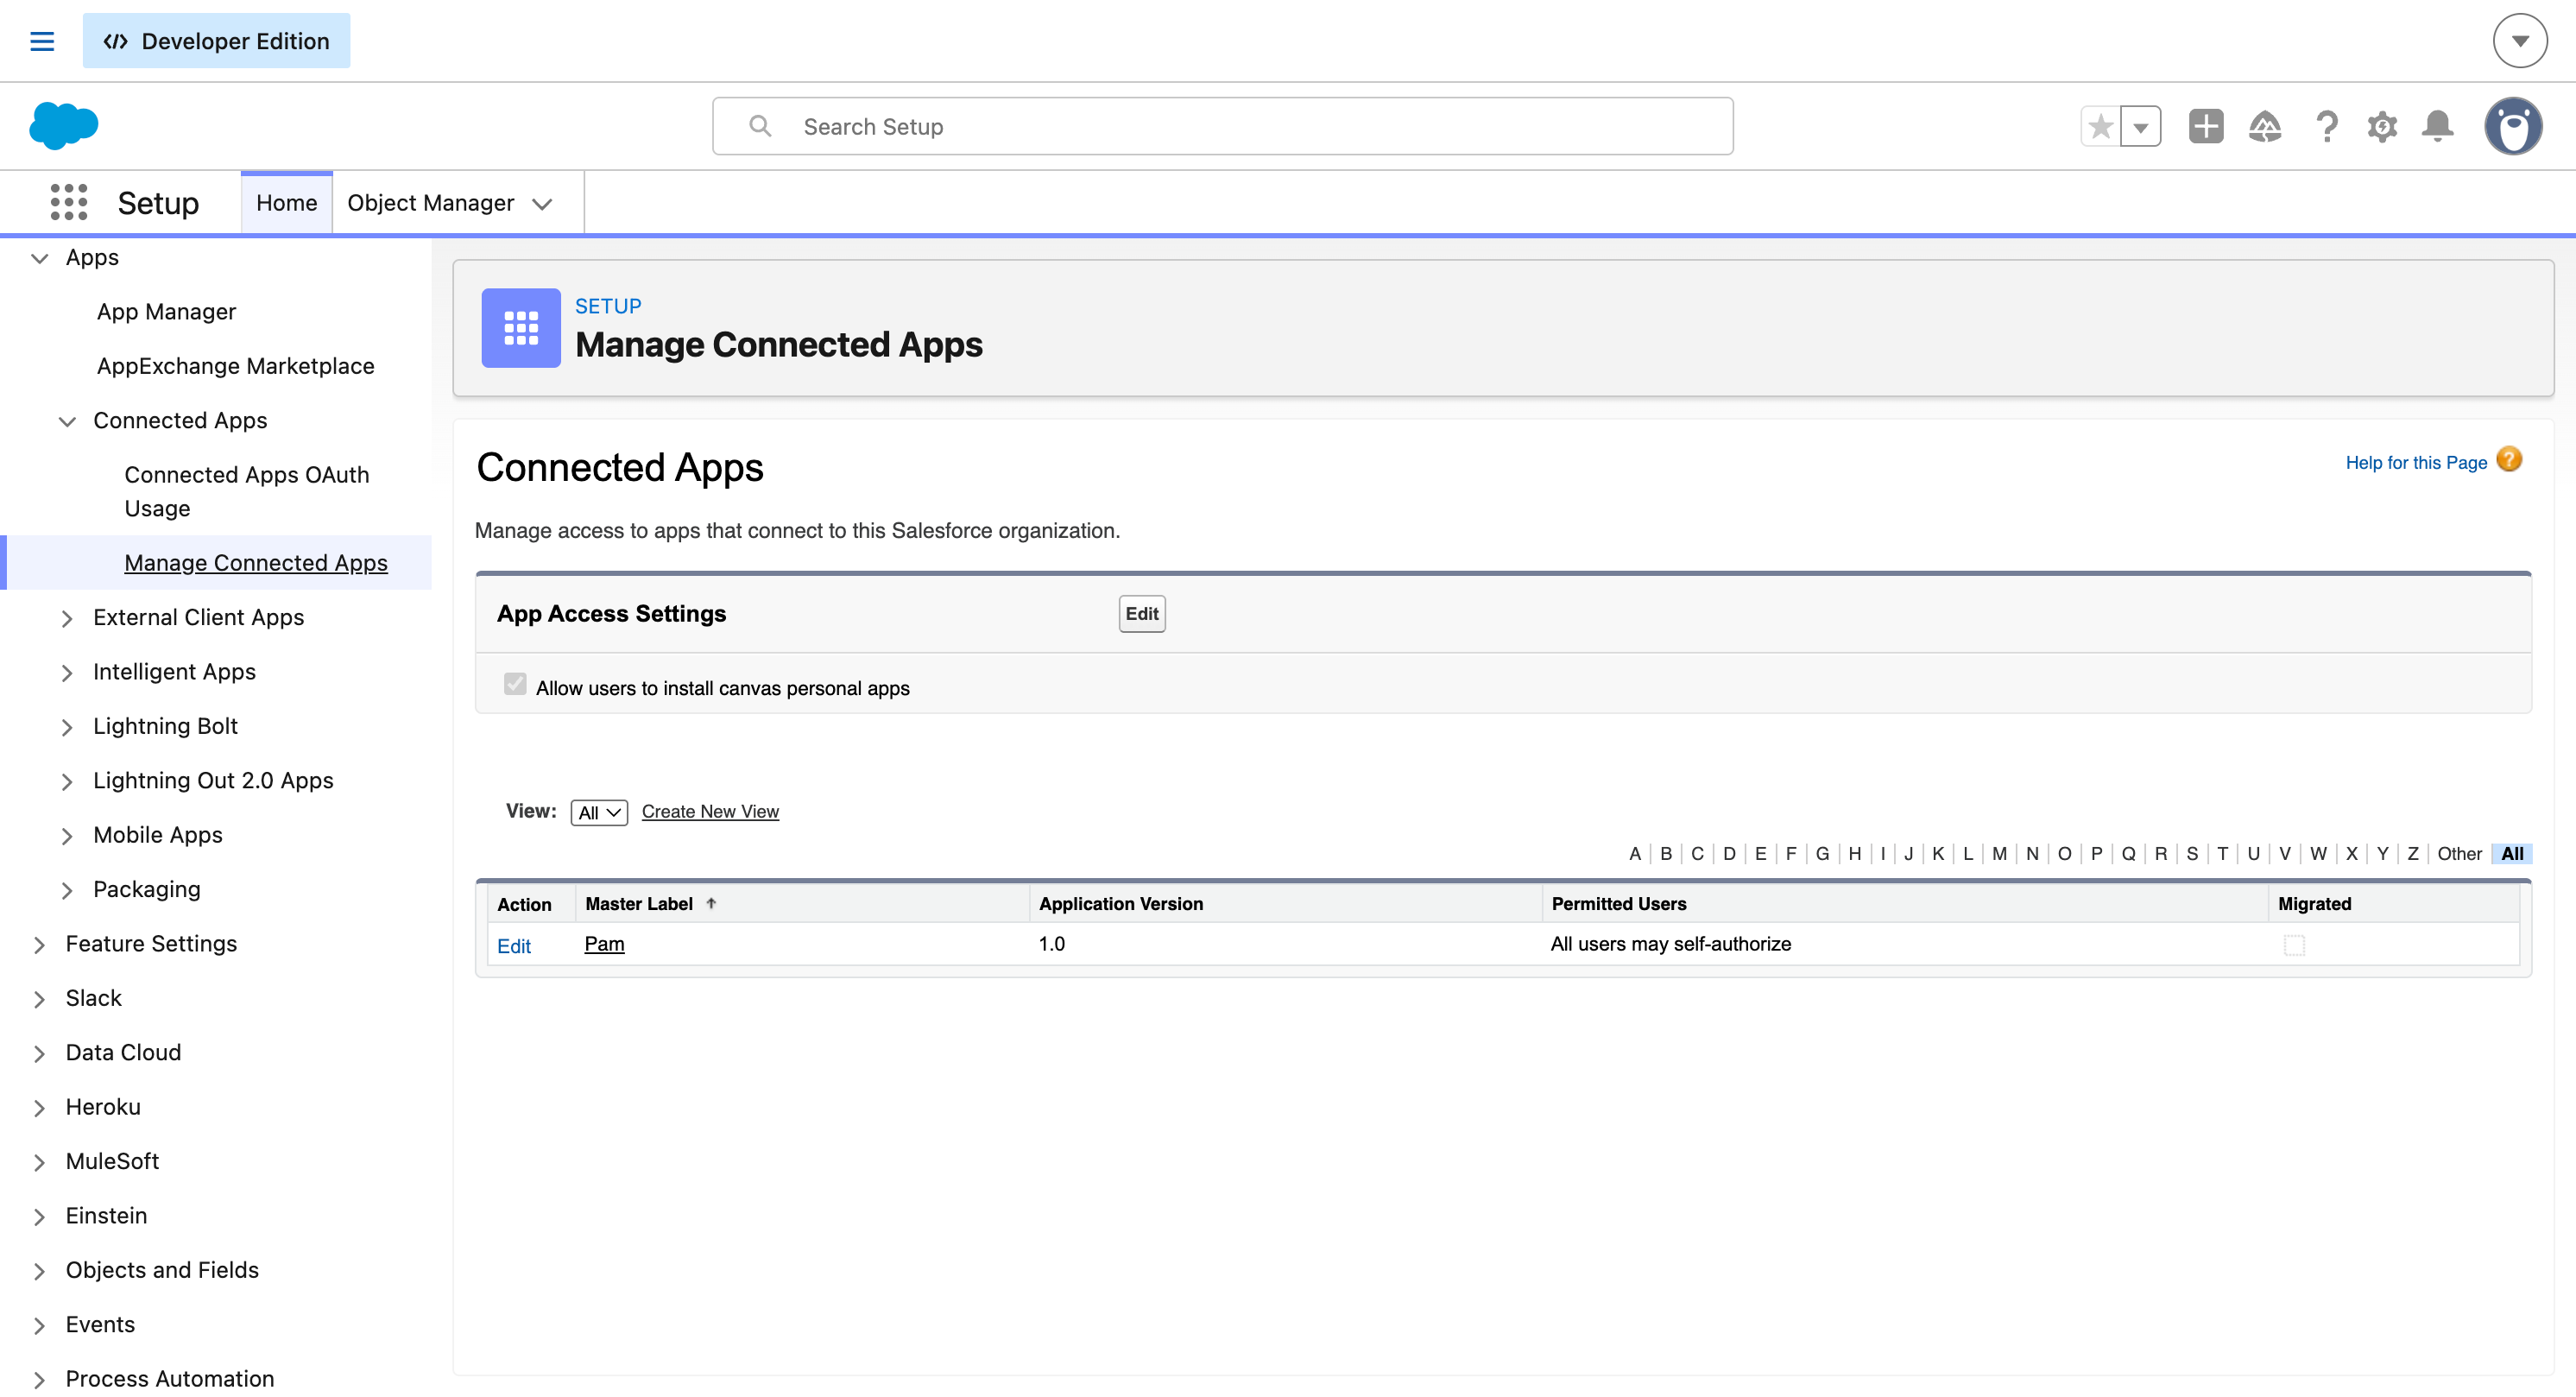 Jam Assistant appears here as version 1.0 with “All users may self-authorize”. Click Edit to modify policies.
Viewing Individual User OAuth Activity
To inspect a specific user’s connected app sessions and token history, navigate to their user record and click Advanced User Details.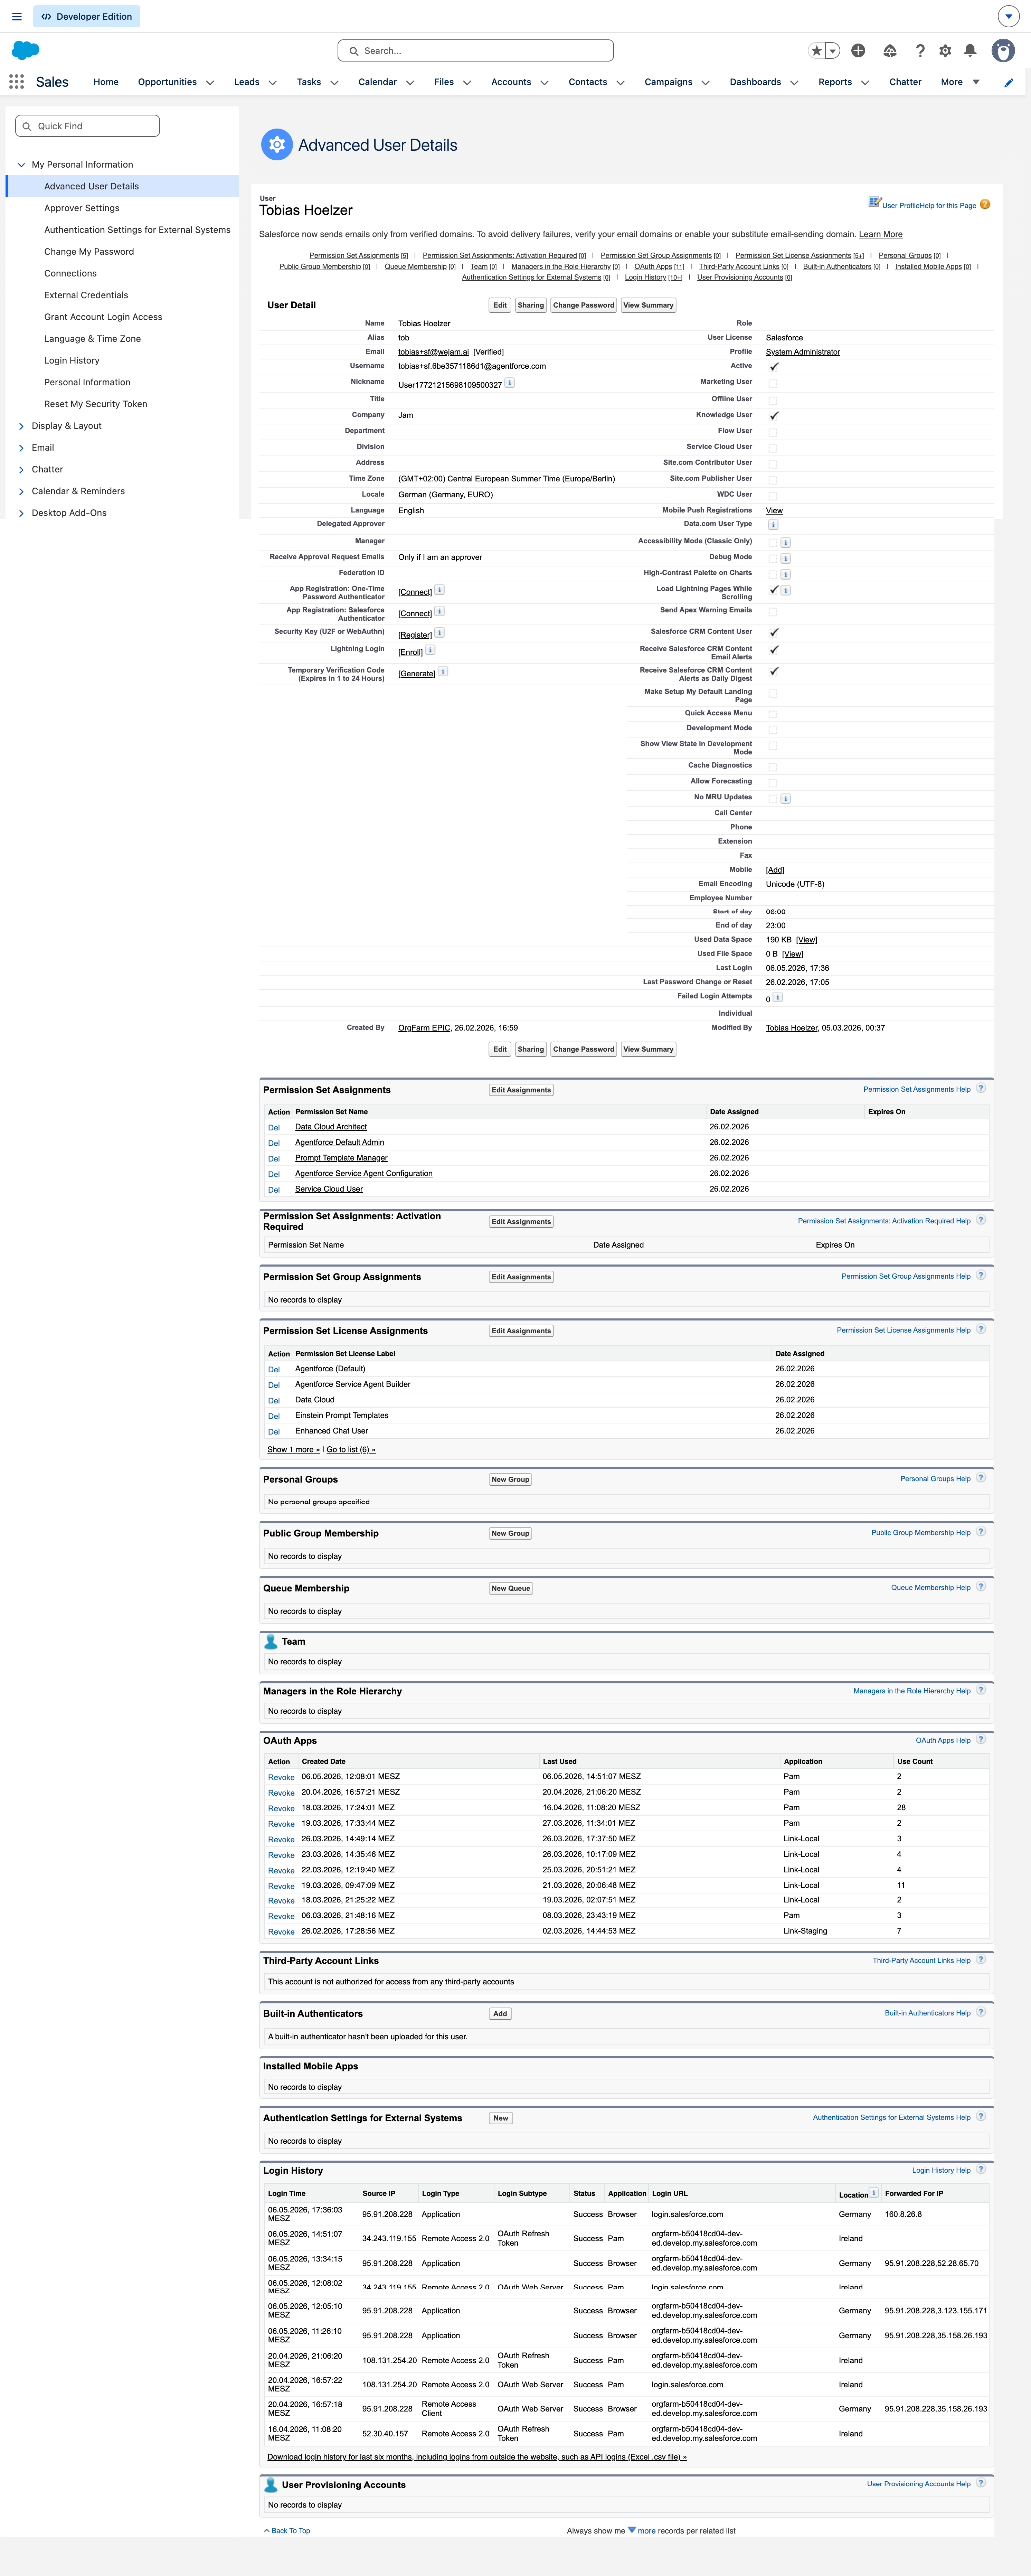 This shows:
- All OAuth tokens granted to this user, including Jam Assistant’s
- Login history with timestamps, IP addresses, and authentication method
- Third-party account links and connected app sessions
Distinguishing Jam Assistant API Calls from User-Initiated Actions
Two Salesforce mechanisms allow you to identify Jam Assistant’s activity separately from direct user actions.1. Login History (session-level)
Every OAuth session Jam Assistant opens is recorded in Login History withApplication = Jam Assistant and Login Type = Remote Access 2.0. Navigate to a user’s Advanced User Details → Authentication History, or export from Setup → Login History.
Filter by
Application = Jam Assistant to see every session Jam Assistant has opened - with timestamp, IP, and auth method.
2. Event Monitoring - ApiEvent (per-request)
With Salesforce Event Monitoring (paid add-on), every individual API request is logged as anApiEvent. Each entry includes CONNECTED_APP_NAME, which will show Jam Assistant for requests made through our integration and null or the user’s client for requests made directly.
This allows you to answer per-request: “was this specific API call made by Jam Assistant or by the user directly?” - including the exact endpoint, object type, timestamp, and the authorising user.
Record-level attribution:CreatedById/LastModifiedByIdon Salesforce records always reflects the authorising user, not the Connected App. This is standard OAuth behaviour - the token acts as the user, consistent with how all OAuth-based integrations operate in Salesforce.
Revoking Access
Revoke a single user’s access
- Open the user’s Advanced User Details
- Find Jam Assistant under Third-Party Account Links or OAuth Tokens
- Click Revoke next to Jam Assistant’s token
Revoke all access at the org level
Two options: Option A - Block in Connected Apps OAuth Usage: Navigate to Setup → Connected Apps OAuth Usage, find Jam Assistant, and click Block. This immediately ends all active sessions and prevents new ones. Option B - Uninstall: From the Connected App Detail page, click Uninstall. This removes Jam Assistant from the org entirely. Users will need to reinstall before reconnecting.Frequently Asked Questions
Does Jam Assistant use a registered Connected App with a consistent OAuthclient_id?
Yes. Jam Assistant is a registered Salesforce Connected App (version 1, description: “Jam Assistant - Your AI Assistant”) with a fixed client_id that is consistent across all customer organisations and all sessions.
Is the Connected App visible in our org’s App Manager?
Yes. Once installed, Jam Assistant appears in Setup → Apps → Connected Apps → Connected Apps OAuth Usage and Manage Connected Apps, where administrators can view user counts, manage policies, and block or uninstall the app.
Can our Salesforce administrator revoke Jam Assistant’s access at the org level, independently of any individual user?
Yes. Two options are available: Block (Connected Apps OAuth Usage - immediately ends all active sessions and prevents new ones) or Uninstall (Connected App Detail - removes Jam Assistant from the org entirely). Both act at the org level regardless of individual user sessions.
Can we distinguish Jam Assistant’s API activity from user-initiated actions?
At the session level: Login History shows Application = Jam Assistant and Login Type = Remote Access 2.0 for all Jam Assistant-initiated sessions - clearly distinguishable from direct browser logins. At the individual request level: Salesforce Event Monitoring (ApiEvent) includes CONNECTED_APP_NAME = Jam Assistant per API call, allowing per-request attribution. At the record level: CreatedById / LastModifiedById reflects the authorising user rather than the Connected App - this is standard OAuth behaviour by design.
Why do CRM record changes show the user’s name rather than Jam Assistant?
Jam Assistant connects to Salesforce using OAuth on behalf of each user. The token acts as that user, so Salesforce attributes record changes to them - the same behaviour as any third-party OAuth integration. This means Jam Assistant respects each user’s individual Salesforce permissions and data access controls.
Can we create a more restrictive permission set after the initial connection to limit blast radius?
Yes - and this is the recommended approach. The OAuth scopes on the Connected App (Perform requests at any time, Access identity URL service, Manage user data via APIs) are fixed and must remain enabled. But Jam Assistant acts as the authorising user, so any Salesforce profile or permission set restrictions on that user are respected automatically. Create a permission set that covers only the objects and fields Jam needs, assign it to your integration users, and Jam will operate within those boundaries without any changes on the Jam side. If the connecting user needs to change (e.g. switching from an admin account to a restricted integration user), revoke the existing token and reconnect as the new user.
What data does Jam Assistant access?
Jam Assistant only accesses data the connected user is already authorised to see in Salesforce. It does not copy or store CRM data - all records are accessed in real time and remain in Salesforce.
Does Jam Assistant connect from a fixed IP address?
Yes. All traffic from Jam Assistant’s servers to Salesforce, for every customer and org type, leaves from a fixed IP address that you can add to your org’s Trusted IP Ranges and profile Login IP Ranges. The address, what it covers, and the Salesforce settings involved are documented in Allowlisting Jam Assistant in Salesforce.